मैं स्क्रीन के बीच में तीन बटन प्रदर्शित करना चाहता हूं, और तीन बटन सभी एक ही चौड़ाई वाले हैं, हालांकि उनके पास अलग-अलग लंबाई के टेक्स्ट लेबल होंगे।समान चौड़ाई वाले बटन कैसे बनाते हैं?
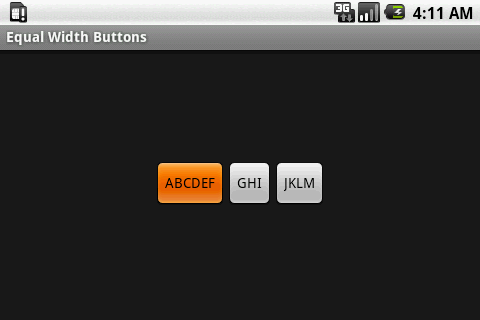
विभिन्न लंबाई के टेक्स्ट लेबल के साथ बस तीन बटन जोड़ना विभिन्न चौड़ाई के बटन उत्पन्न करता है। -
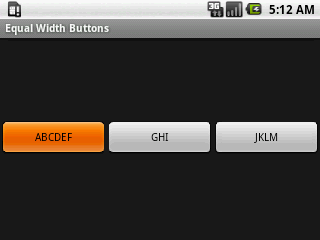
1 layout_weight और layout_width सभी बटन पर 0dip करने के लिए उन्हें समान रूप से फैलाने के लिए पूरे स्क्रीन को भरने के लिए कारण बनता है की स्थापना
:
<?xml version="1.0" encoding="utf-8"?>
<LinearLayout
    xmlns:android="http://schemas.android.com/apk/res/android"
    android:orientation="horizontal"
    android:layout_width="fill_parent"
    android:layout_height="wrap_content"
    android:layout_gravity="center_vertical"
    android:gravity="center">
    <Button
     android:id="@+id/button_1"
     android:layout_height="fill_parent"
     android:layout_width="wrap_content"
     android:text="ABCDEF" />
    <Button
     android:id="@+id/button_2"
     android:layout_height="fill_parent"
     android:layout_width="wrap_content"
     android:text="GHI" />
    <Button
     android:id="@+id/button_3"
     android:layout_height="fill_parent"
     android:layout_width="wrap_content"
     android:text="JKLM" />
</LinearLayout>
डिफ़ॉल्ट बटन चौड़ाई सामग्री लपेटता चौड़ाई। जो मैं चाहता हूं, उसके लिए ऐसे बटन बहुत बड़े हैं, खासकर बड़ी स्क्रीन पर। ,
माता पिता LinearLayout में weightSum के लिए अलग मान स्थापना पूरे स्क्रीन भरने से बटन को रोकने के लिए इस्तेमाल किया जा सकता -
:
<?xml version="1.0" encoding="utf-8"?>
<LinearLayout
xmlns:android="http://schemas.android.com/apk/res/android"
android:orientation="horizontal"
android:layout_width="fill_parent"
android:layout_height="wrap_content"
android:layout_gravity="center_vertical"
android:gravity="center">
<Button
android:id="@+id/button_1"
android:layout_height="fill_parent"
android:layout_width="0dip"
android:layout_weight="1"
android:text="ABCDEF" />
<Button
android:id="@+id/button_2"
android:layout_height="fill_parent"
android:layout_width="0dip"
android:layout_weight="1"
android:text="GHI" />
<Button
android:id="@+id/button_3"
android:layout_height="fill_parent"
android:layout_width="0dip"
android:layout_weight="1"
android:text="JKLM" />
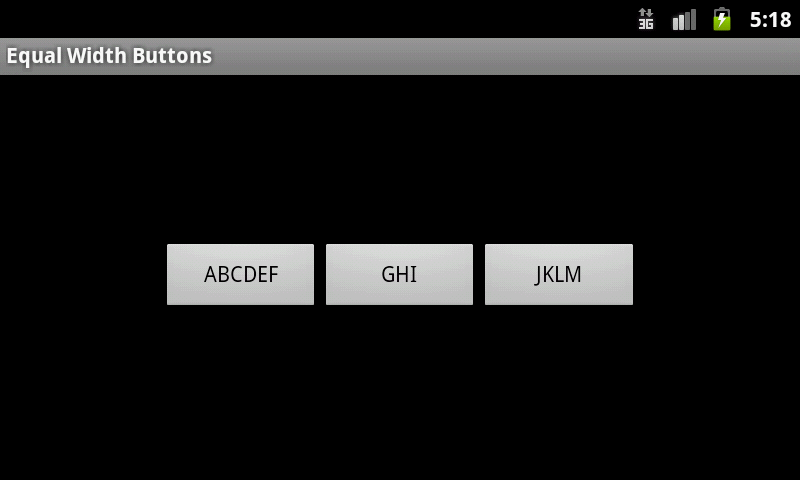
</LinearLayout>लेआउट वजन 1 बटन स्क्रीन चौड़ाई को भरने लेकिन मुझे नहीं लगता कि यह वह रास्ता है जिसे मैं लेना चाहता हूं, क्योंकि मैं नहीं चाहता कि बटन बड़े स्क्रीन उपकरणों पर स्क्रीन के बड़े हिस्से पर कब्जा कर लें। वज़नसम का उपयोग करके स्पष्टीकरण के लिए, उदाहरण के लिए, मैं तीन बटनों को सामूहिक रूप से आधा स्क्रीन चौड़ाई पर कब्जा करने के लिए सेट कर सकता हूं, जो छोटी स्क्रीन पर ठीक दिख सकता है, लेकिन बड़ी स्क्रीन पर, बटन अभी भी आधा स्क्रीन चौड़ाई पर कब्जा कर लेते हैं, और बटन जो भी मैं चाहता हूं उससे काफी बड़ा होगा। शायद अंतिम समाधान के लिए अलग-अलग स्क्रीन के लिए अलग-अलग लेआउट फाइलें होंगी, लेकिन मैं इस पथ को नीचे नहीं जाना चाहूंगा।
<?xml version="1.0" encoding="utf-8"?>
<LinearLayout
    xmlns:android="http://schemas.android.com/apk/res/android"
    android:orientation="horizontal"
    android:layout_width="fill_parent"
    android:layout_height="wrap_content"
    android:layout_gravity="center_vertical"
    android:gravity="center"
    android:weightSum="5">
    <Button
     android:id="@+id/button_1"
     android:layout_height="fill_parent"
     android:layout_width="0dip"
     android:layout_weight="1"
     android:text="ABCDEF" />
    <Button
     android:id="@+id/button_2"
     android:layout_height="fill_parent"
     android:layout_width="0dip"
     android:layout_weight="1"
     android:text="GHI" />
    <Button
     android:id="@+id/button_3"
     android:layout_height="fill_parent"
     android:layout_width="0dip"
     android:layout_weight="1"
     android:text="JKLM" />
</LinearLayout>
वजन राशि 5 छोटे परदे:

वजन राशि 5 बड़ी स्क्रीन:
-
मैं भी TableLayout साथ बहुत सी बातें करने की कोशिश की, लेकिन 'नहीं था केवल LinearLayout का उपयोग करने से बेहतर कुछ नहीं मिलता है।
ग्रिड व्यू उपयोग करने के लिए अतिरिक्त बेकार है, और मैंने अभी तक यह कोशिश नहीं की है।
तो, कोई समान चौड़ाई वाले बटन कैसे बनाता है, वहीं, जहां वे सबसे लंबे लेबल वाले बटन की सामग्री को फिट करने के लिए आवश्यक हैं?
किसी भी सलाह की सराहना की जाती है।
कैसे एक कस्टम लेआउट लिखने के बारे में? – bigstones